
Does your kitchen double as a Formule 1 cockpit, courtesy of your refrigerator’s loud and annoying noises?
But wait, it could get worse:
The noise could indicate an underlying problem with your refrigerator that might burn a hole in your pocket down the lane.
It’s natural to get alarmed by it. But do not panic and call the service hotline just yet.
Most refrigerators make operational noises and are perfectly normal (more on that later!)
“But how do I differentiate and fix such noises?” I hear you ask.
Thankfully, we devoured the major brands’ product manuals like LG, Samsung, GE, Whirlpool, and more to hear straight from the horse’s mouth. We also brought appliance repair analysts with a lifetime of experience to chime in with their thoughts.
Let’s get right into it!
- 1. Where Exactly is the Sound Coming from?
- 2. Check for a Loose Drain Pan if You Hear Rattling Sound
- 3. Ensure Your Unit is Resting Solidly Levelled on the Floor if You Hear Rattling Sound
- 4. Defrost Thermostat if You Hear a hissing, sizzling, or a buzzing Noise
- 5. Hear a Ticking or Scraping Noise? Check the Defrost Timer
- 6. Inspect the Evaporator for Defects
- 7. Is the Condenser Malfunctioning?
- 8. Fridge Making a Loud Humming or Buzzing Noise? Inspect the Compressor
- 9. How to Fix Refrigerator Knocking Noise? Check the Water Inlet Valve for Issues
- 10. Refrigerator Popping or Clunking Noise? Check Door Closure Cams
- 11. Refrigirator Making Beeping Sound? Here's How to Fix
- 12. Are my Refrigerator Noises Normal?
- 13. What's the Average Refrigerator Lifespan?
- 14. Why Does My Fridge Make Noise at Night?
- 15. Is a Noisy Fridge Dangerous?
- 16. Why Does My Refrigerator Noise Stop When the Door is Opened?
Warning: Before making any repair or replacement to your loud refrigerator, make sure you disconnect the power supply. The easiest way is to unplug the unit from the wall. Alternatively, you could trip the appropriate switch in the circuit breaker panel or remove the proper fuse from your home’s fuse box.
Ensure that the water controls under the sink are turned off.
1. Where Exactly is the Sound Coming from?
There could be a dozen different reasons behind your refrigerator’s loud noises. If only there were a way you could use to identify and narrow down the cause…
Well, you’re in luck—there is.
Turn off any noise from heavy kitchen appliances nearby and listen closely to where the sound is coming.
If the noise is coming from the bottom of the unit—the drain pan is likely loose.
If the noise is coming from the back of the unit—that could indicate issues with the compressor, defrost timer, or the condenser fan.
If the noise seems to be coming from inside the unit, there’s likely a fault with the evaporator.
Please note that these are just general most-likely guidelines. Use these tips to troubleshoot faster by skipping to the relevant sections below.
In the next section, we shall cover how to fix each in great detail.
Let’s start with the one easiest to fix.
2. Check for a Loose Drain Pan if You Hear Rattling Sound
The drain pan also called the drip pan, is the part of your refrigerator that collects water as it comes out of the defrost drain. Although refrigerators vary in design, the drain pan is universally located at the bottom of the unit. This allows the liquid to flow from the top to the bottom quickly.
Here’s how to locate it:
- You can pull it out if you have a front-access drip pan. It should look like a small rectangular tray.
- In most cases, it’ll be hidden behind the back panel. We’d recommend you turn off the water supply to the refrigerator so that it doesn’t leak.
- If you can’t find the drip pan, get a flashlight and try to find the defrost drain line. Follow it downwards until you find the drain opening. The drip pan should be located underneath the opening.
- Now, secure the drain pan in place.
That’s it!
Note that there can be a few other reasons for these sounds.
According to the technicians at LG, rattling noise may also come from the refrigerant flow and the water line on the back of the unit. This is normal operational noise and, in most cases, nothing to worry about.
However, if you’re still bothered by a rattling noise, there’s one other simple fix you can try. We cover it in the next section.
3. Ensure Your Unit is Resting Solidly Levelled on the Floor if You Hear Rattling Sound
If your refrigerator is placed on a weak or uneven floor, try moving it to a sturdy bottom.
If it’s already resting on a sturdy floor, ensure that the leveling legs are correctly adjusted. Sometimes, the legs can fall out of adjustment.
Here’s how to adjust the legs of your refrigerator.
- Locate the legs. In most units, they should be accessible without having to remove any panels.
- Look for screws and a removable plate
- Look for a slot along the top or a hex-fitting. You will need a flat-head screwdriver to adjust the legs.
- If you have a hex-fitting, you will require an adjustable wrench or a ser of pliers.
- Turning clockwise lowers that corner of the unit and vice-versa.
If you aren’t sure if it is properly leveled, you can try checking it with a spirit level.
Here’s another pro-tip.
If you have tile floors, It’s also possible that it is reflecting that noise. It isn’t much of a problem with vinyl floors since they absorb more sound relatively. Try folding a piece of carpet in half and stuffing it under there.
4. Defrost Thermostat if You Hear a hissing, sizzling, or a buzzing Noise
Ask yourself:
What kind of freezer do I have—a self-defrost or manual defrost one?
For the uninitiated, a self-defrost is a cleaning feature in freezers containing automatic heating elements to prevent ice or frost build-up.
Most upscale refrigerators made by US manufacturers include automatic defrost as a standard feature.
| Self Defrost Freezer | Manual Defrost Freezer | |
| Appearance | Upright and chest styles | Upright and chest styles |
| Maintenance | Little to none | Time-consuming |
| Noise | Noisy | Less noisy |
| Cost | More expensive | Less expensive |
A self-defrosting freezer is a tad bit noisier than a manual defrost refrigerator, due to the constant cycling on and off the defrost setting. However, this is normal operational noise and nothing to worry about in most cases.
According to GE appliances, “A hissing, sizzling, buzzing, or arching noise may be heard on self-defrost models. This is produced when water drips on defrost heaters. This is completely normal.”
If the defrost heating element is malfunctioning, it can lead to excess noise touching the fan turbine, creating noise.
Here’s how you can test this:
- Identify and locate the defrost heating element. You’ll usually find it fixed onto the evaporator
- Ensure that all the connectors are disconnected
- Put your multimeter is ohmeter mode. If you don’t have one, we recommend getting this multimeter.
- Place both the tester’s tips on the heating elements terminals.
- Check for continuity, i.e, the meter should show a reading.
If it doesn’t display a reading, you will need to replace it.
In rare cases, faulty thermal fuses can also lead to this noise. This is because a faulty thermal fuse can create excess ice with no defrosting, which will lead to ice rubbing against the fan’s blade.
You can use the same multi-meter mentioned above to check the thermal hose’s terminals for connectivity. If the meters do not display a reading, it’s time to replace them.
According to RepairClinic, a typical cost for a General Electric (GE) refrigerator thermal fuse is upwards of $20.
5. Hear a Ticking or Scraping Noise? Check the Defrost Timer
Do you hear a ticking or scraping noise from the fresh food compartment? Is it a continuous clicking sound?
The defrost timer could be likely to blame.
If a defrost timer fails to reset itself, it simply clicks itself repeatedly, manifesting this ticking sound.
Here’s how to fix the defrost timer:
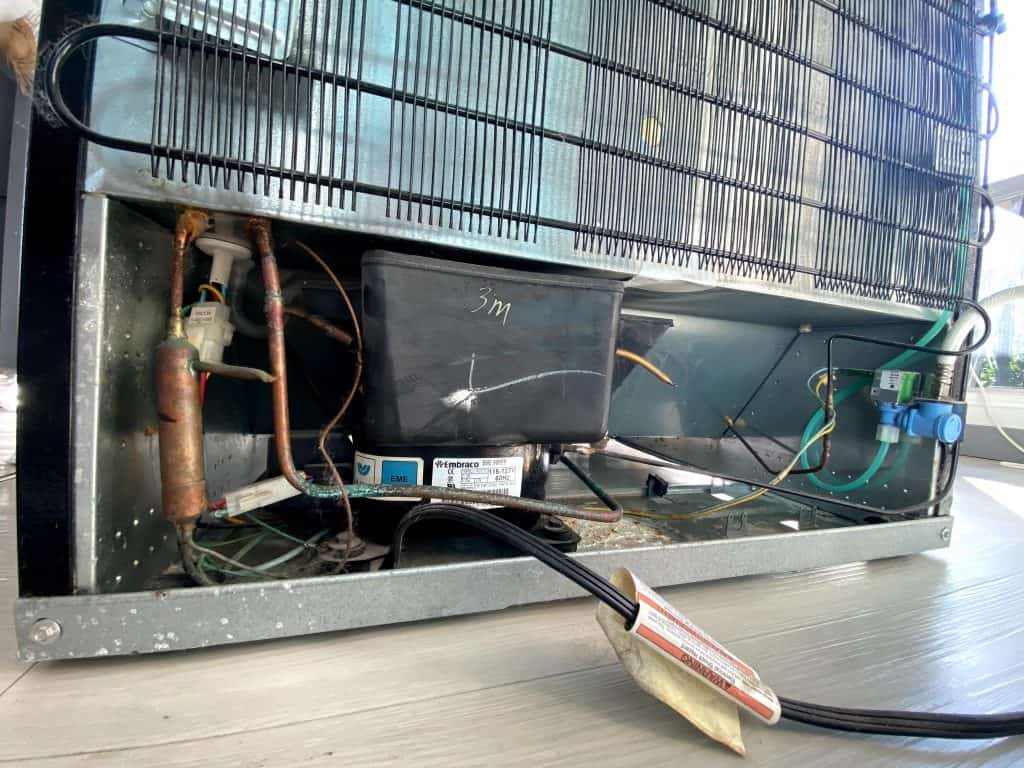
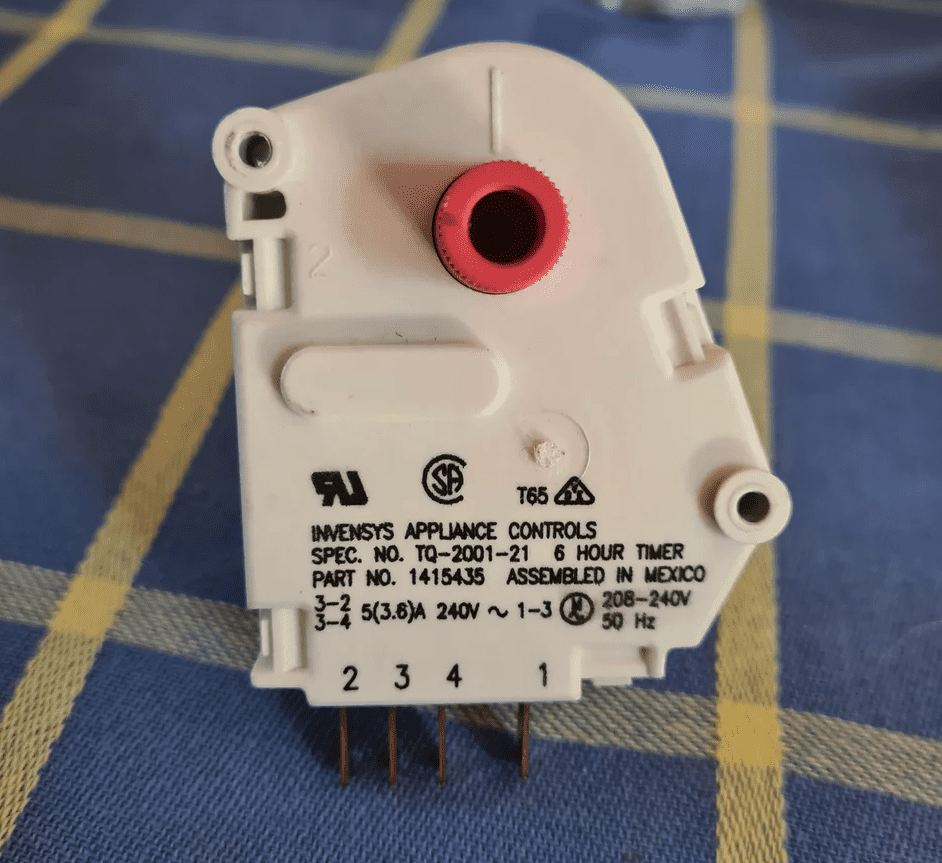
- Identify and locate the defrost timers. Usually, is located behind the refrigerator’s lower kickplate. Some manufacturers can also include it in the control panel or behind your unit. Try looking for four metallic terminals extending from the bottom.
- If it’s concealed inside a plastic casing, remove it.
- Use an advanced it’s screw clockwise to twist it until you hear a click
- Turn your refrigerator back on and leave it alone for about 45 minutes.
- If you can still hear a clicking sound, the defrost timer is broken and needs to be replaced.
At this point, you can either call a professional to replace, or if you’re a DIY enthusiast, you can replace it yourself.
For context, a Whirlpool refrigerator defrost timer could cost you somewhere between $50 and $100, depending on your model.
If you choose to buy the part and get your hands dirty, here’s how you can replace it yourself:
- Remove all the screws and pull the timer out enough to disconnect its wires
- Connect the wire connector to your new defrost timer
- Fasten it in place using the screws
- Put back the plastic casing
Plug the refrigerator back in. You’re all set now.
6. Inspect the Evaporator for Defects
The evaporator fan pulls air through the condenser coils and blows cool air throughout the fridge. Put simply; it’s responsible for cooling the refrigerator.
Here are some tell-tale signs that there’s something wrong with the evaporator fan:
- Your refrigerator is warmer than usual
- Ice takes more than usual time to form
Sometimes, it’s easy to confuse the evaporator fan problem with the condenser fan because typically you hear both the noises from the back of the fridge.
An easy way to find it if it’s an evaporator fan problem is to open the back of your refrigerator. If the noise gets even louder, this is typically a sign of an evaporator problem.
Now that we have covered the basics let’s narrow down to find out which part of the evaporator is defective.
Pro-tip: Take care when accessing the evaporator fan, as it may be connected to a thermistor.
6.1 Evaporator Fan
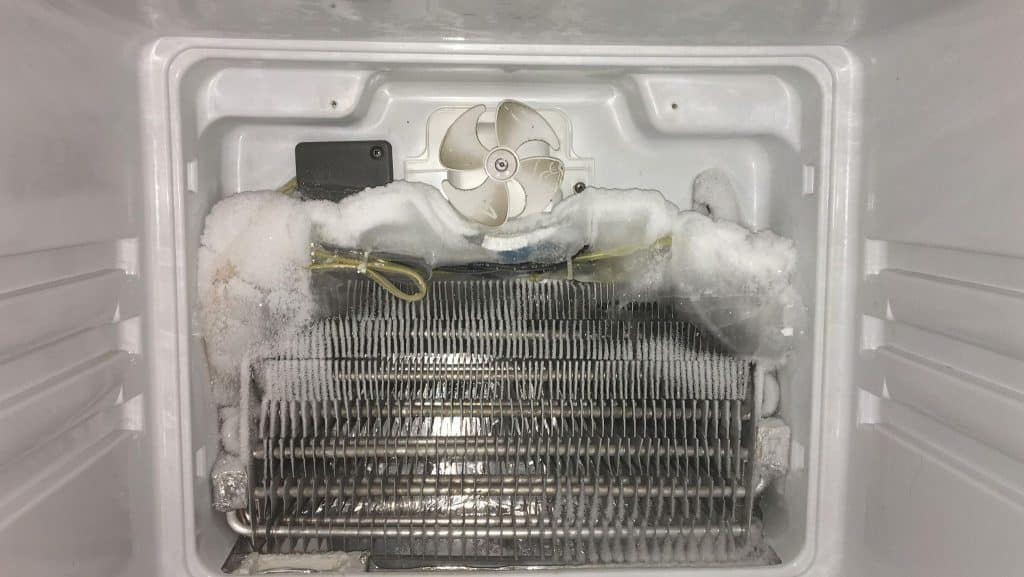
Here’s how to inspect the evaporator fan blade for issues:
- Locate the evaporator fan. It’s usually located at the back of the fridge.
- Remove the evaporator cover using an appropriately-sized screwdriver
- Make sure nothing is blocking the fan from spinning. If you feel any resistance while rotating the blade, the motor is most likely defective and needs to be replaced.
- Check the fan blade for damage.
If the evaporator fan blade is defective, it’s time to replace it with a new one.
6.2 Inspect the Evaporator Motor if You Hear a Squeaking Noise
Moisture and cold temperatures can put a strain on an evaporator motor’s bearing, which leads to a faulty evaporator motor.
Here’s how to check the evaporator motor on your fridge:
- Unmount the screws and pull the evaporator cover out
- Remove the fan blade from the motor shaft
- Look for signs of damage or normal wear and tear on the motor
- If the motor shaft doesn’t turn freely, consider replacing it
- Here’s a great detailed guide (with pictures!) on how to replace an evaporator fan motor.
I’d recommend you defrost your freezer before attempting to replace the evaporator motor, though. This is to ensure it’s not the excess ice contributing to the noise.
6.3 Evaporator Grommet
The evaporator grommet is a small, 1-inch part that isolates the motor from the mounting bracket. It can come in various colors, although in my experience, it’s mostly red.
You should find it behind the evaporator fan cover, on the rear of your freezer. Inspect the evaporator grommet for signs of wear and tear. If it looks worn out, consider replacing it.
7. Is the Condenser Malfunctioning?
7.1 Condensor Motor Fan
Without diving too much into the technical details, the condenser, along with the evaporator, removes heat from inside the refrigerator and transfers it outside.
A tell-tale sign that the condensor is malfunctioning is it’s not staying as cool as usual.
Here’s how to inspect the condenser fan motor on your refrigerator:
- Remove the rear access panel on your unit.
- Locate the condenser fan motor and unscrew the mounting screws
- Check the condenser fan blades for signs of wear and tear. If there are considerable signs of wear and tear, consider replacing it. While you’re at it, also make sure to check the rubber mounting grommets.
- Try spinning the fan with your hand. If you feel some resistance, light lubrication can be handy, like this one.
I also recommend cleaning since the back of the refrigerator can get quite dusty. Consider vacuuming it so that it’s clear of any obstructions like dust or debris.
7.2 Condenser Coils
Although not common, it’s also possible that the tubes and the condenser coil located at the rear of your refrigerator can become loose and start vibrating. Sometimes, the tubes can touch each other, creating more vibrations. If you notice so, simply pull them apart.
8. Fridge Making a Loud Humming or Buzzing Noise? Inspect the Compressor
Often dubbed the “heart of the refrigerator,” the compressor circulates the refrigerant throughout the system and warms it up.
Since you’re dealing with the “heart” here, I’d recommend you leave this one to the certified repairs guys.
Don’t get me wrong, it’s certainly possible to DIY it, but it’s often better to leave it to the pros due to the complexity involved.
If you still decide to do it by yourself, start by cleaning the compressor. Here’s how:
- Dab a damp cloth with a little soap.
- Wipe the coils to remove the dirt. You can also use a scrub or a soft brush
- If your refrigerator sits in a moist area, use a vacuum to clean the coil and the compressor
- Do not plug in the refrigerator until the compressor and coils are completely dry
While you’re at it, also make sure to check the internal valves. If they’re worn out, they’ll have trouble circulating the coolant, thus obstructing the fan blade and cracking noise.
9. How to Fix Refrigerator Knocking Noise? Check the Water Inlet Valve for Issues
Does your refrigerator make a noise when you draw water, or the ice-maker is filling?
The water inlet valve could be likely to blame.
Not sure what that is?
The inlet valve simply connects your home’s water supply to your refrigerator.
85% of American homes have hard water – water that contains high levels of calcium and magnesium. If you see chalky white spots on your dishwasher, this could mean that you have hard water at your home.

Over time, minerals or sediment deposits can obstruct the valve’s interiors, leading to a knocking or buzzing sound.
The issues with the water inlet valve could be both—mechanical and electrical—including bad solenoids, jammed plungers, and clogged valves.
If your refrigerator sounds like a jackhammer while using the water dispenser, I recommend getting your water inlet valve inspected by a professional.
Before you do so, try checking if your home’s water pressure is appropriate.
10. Refrigerator Popping or Clunking Noise? Check Door Closure Cams
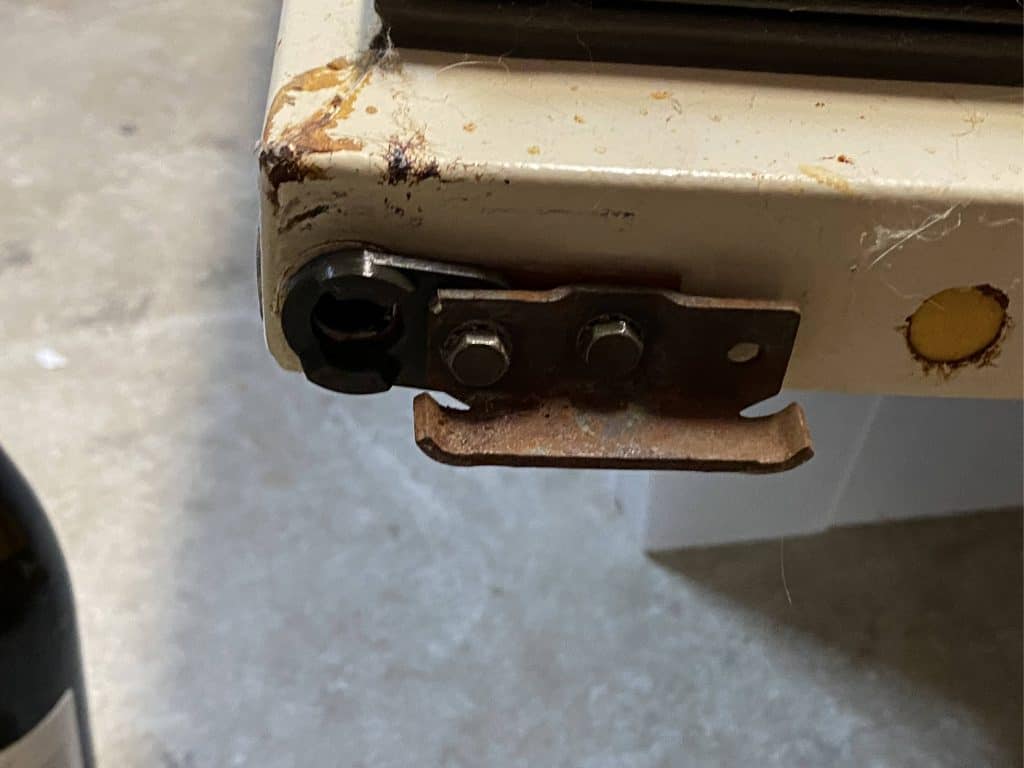
The door closer cam kit raises the door to keep it from touching the refrigerator liner when the door is closed.
If the door closure cam has a broken door hinge, it can cause a cracking or popping noise. As you’d expect—the door does close completely or tightly.
Visually inspect it for signs of wear and tear. If it appears to be damaged, replace it.
Sometimes you can find a door closure cam individually, but you’d be required to purchase a complete set more often than not.
11. Refrigirator Making Beeping Sound? Here’s How to Fix
Depending on the manufacturer, your refrigerator might make a beeping noise that could indicate several things:
- Ensure that the fridge and freezer are not over-stuffed: Overstuffing can prevent the doors from closing properly, thus setting off the alarm.
- Ensure the door seal isn’t damaged: Damaged door seals can prevent the door from closing properly, setting off the alarm. Try cleaning it with a damp cloth to remove any dirt and debris.
- Ensure there’s no excessive build-up of ice: If you don’t have an auto-defrost refrigerator, it may lead to an excessive build-up of ice, triggering an alarm. Simply try defrosting it manually.
12. Are my Refrigerator Noises Normal?
Although you might get alarmed by some noises, do not panic and call the service hotline just yet.
A refrigerator is a complex cooling system with many moving parts. In many cases, the noises are normal operational noises.
Some of the refrigerator noises that are completely normal and you should not be worried about are:
- Gurgling or dripping, for example, could be Freon boiling in the evaporator, which is how it cools the fridge. It could also be when the ice melts during the defrost cycle and water runs into the drain pan.
- Buzzing is a typical sound that may occur when the refrigerator compressor or fans are adjusted to optimize performance.
- You may hear a hissing noise when the refrigerant is flowing through the cooling system.
- Do you hear a humming or pulsating sound? Inspect if the ice maker is turned off or if your refrigerator isn’t connected to a water supply
- A popping noise is a typical sound a refrigerator makes as its inside walls contract and expand, which may happen as it cools down for the first time or defrosts. As the temperature fluctuates, the walls can expand and contract. This expected change in temperature can cause a creaking sound.
- A sizzling sound is likely from water dripping on the defrost heater.
13. What’s the Average Refrigerator Lifespan?
According to the United States Department of Energy, refrigerators last approximately 12 years. However, if your refrigerator is more than ten years old, consider replacing it rather than sinking money into repairs and replacements.
14. Why Does My Fridge Make Noise at Night?
It’s likely that your ice maker is cycling and refilling the bin with fresh ice cubes. This happens periodically throughout the day as well. It’s just that other noises mask this sound during the day.
15. Is a Noisy Fridge Dangerous?
In most cases, noisy fridges are not dangerous. Some sounds like buzzing or humming may be normal compressor operation while rattling or ticking sounds could indicate a problem with the evaporator, condenser, or the compressor.
16. Why Does My Refrigerator Noise Stop When the Door is Opened?
If the noise stops when you open the door, the evaporator fan is likely malfunctioning. Ensure that nothing obstructs the fan and check for everyday wear and tear. If it’s damaged, consider replaxing it.