
When you flush the toilet, does it sound like your pipes are about to explode?
Over the years, I’ve heard many homeowners complain about banging, groaning, rattling, squealing, or humming noises from their walls/pipes.
It not only makes you hesitate to flush and startle unsuspecting guests, but it can also be an indicator of a more significant underlying issue: If it’s a water hammer noise, it can eventually damage your plumbing fittings—leading to expensive repairs due to water leaks in your home’s walls.
To make matters worse:
I’ve heard people spending hundreds of dollars having a plumber replace the arrestors and still couldn’t get rid of the noise.
If you care about saving time and hard-earned money, you need someone who can hand-hold you step-by-step as you diagnose the underlying issue. Thankfully, I had the privilege of knowing several licensed plumbers while running a full-service construction company in Phoenix, AZ.
I’ll use my first-hand experience to show you how to fix the noise from walls/pipes when you flush your toilet.
Let’s go!
- 1. The Problem: My Toilet Makes Knocking or Banging Noise From the Pipes When Flushing the Toilet
- The Fix
- 1.1 Turn off the Stopcock Valve and Turn it Back on Slowly
- 1.2 Drain the Waterlogged Air-filled Chambers in Your Plumbing System
- 1.3 Ensure Water Hammer Arrestors are Installed Properly
- 1.4 Use a Pressure Reducing Valve to Reduce the High Water Pressure in Your Home
- 1.5 Nothing Works? Install a Slow Shut off/Gentle Toilet Fill Valve
- 2. The Problem: Rattling Sound in Plumbing Pipes? Pipes May Have Become Loose From Their Support
- The Fix
- 3. The Problem: My Toilet Makes Whining Noise From Pipes After Flushing
- The Fix
- 4. The Problem: My Toilet makes Froghorn Sound
- The Fix
1. The Problem: My Toilet Makes Knocking or Banging Noise From the Pipes When Flushing the Toilet
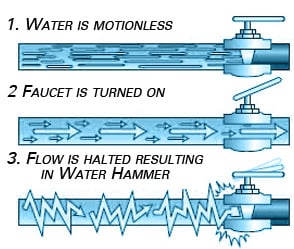
Water is incompressible, so its volume doesn’t change—no matter how much force you apply.
Skipped your science class?
Don’t worry. Here’s what it means:
When you shut off the water supply to your toilet, the fast-moving water comes to an abrupt stop and makes a loud banging or knocking noise with the pipes. This creates a “shock wave effect, ” commonly referred to as water hammer noise.
Here’s an analogy you might find helpful: (I always share this with homeowners facing this issue)
If you have a pipeline 1 meter in diameter that runs for 100 kilometers, the pipe’s water mass is about 80 million kilograms. It’s the equivalent of 10 freight trains.
Imagine you’re an operator at the end of this pipeline in charge of closing a valve. If you close it quickly, you have essentially slammed those trains into a brick wall. This can cause serious damage/noise or even rupture the pipe.
Practical Engineering
The Fix
Now that we’re brushed up on the fundamentals let’s go through various methods we can use to try and fix it.

EXPERT TIP!
There’s a lot of misinformation on how to fix the banging or knocking noise, but remember the basics: Any decent method should involve reducing the speed of water through the pipe. This can usually be done by reducing the flow rate or increasing the size of the pipe.
Kurt Joyce, Construction Service Owner based in Phoenix, AZ.
1.1 Turn off the Stopcock Valve and Turn it Back on Slowly
We recommend trying this simple tip before moving on to more advanced methods.
- Locate and identify your main stopcock valve.
- Twist the valve clockwise to turn the supply off.
- Twist it counter-clockwise to turn it on again slowly.
Turning the stopcock valve back a turn or two has fixed this issue on about ~30% of our visits.
Did this work for you?
If not, don’t panic call a plumber; there are still plenty of things you can try yourself.
1.2 Drain the Waterlogged Air-filled Chambers in Your Plumbing System
The median age of homes in the U.S is 37 years old, with homes in the Northeast being as old as 58 years.

Was your home built before the 1960s?
Many homes before the 1960s had air chambers to help prevent water hammer. The air chamber is basically a pipe extension connected to your water supply pipe (“T” fitting) that provides the air cushion to absorb shocks of the water’s crash. These air chambers may fill with water over time, rendering them ineffective at stopping water hammer.
Fortunately, it’s easy to drain the waterlogged or clogged air chambers. Here’s how:
- Locate and identify the main water supply to your home. If your home has a basement, it may be located near the front of the house on an interior wall. If your home was built on a slab, it might be inside your garage.
- If the valve is gate-style, turn it clockwise to turn it off. If it’s a ball valve, turn the valve 1/4, so it’s perpendicular to the water pipe.
- Open all the cold water faucets starting with the ones on the highest floor and working your way down. Let water drain from all the faucets for up to 30 minutes.
- Flush all the toilets. It might be a good idea to flush the water heater and other appliances while at it.
- Turn on the main water supply. Wait for up to 10 minutes.
- Close the water faucets starting from the bottom and working your way up. The toilets should be automatically refilled.
Once you have completed the above steps, try flushing the toilets and check for the sound again. The banging or knocking noise should be fixed if the issue was water-filled or clogged air chambers.
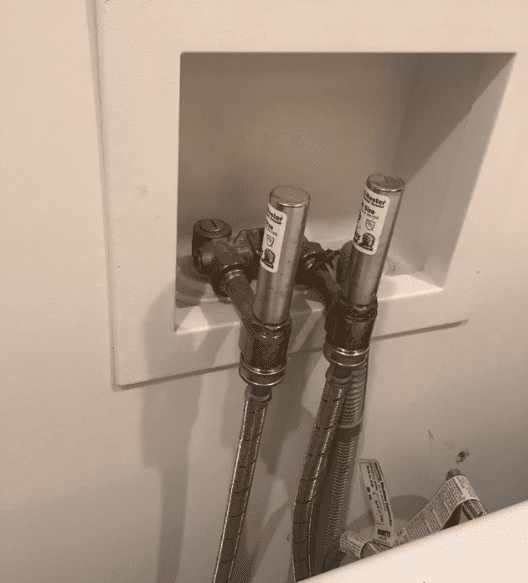
1.3 Ensure Water Hammer Arrestors are Installed Properly
Was your home built from the 1970s to the 1990s?
If so, most homes built in that period had no water hammer protection. If that’s the case, you’ll need to install an arrestor on the water fill line. You can either DIY it or call a professional plumber.
The DIY should be pretty straightforward in most cases. All you need is a tongue-and-groove plier and a water arrestor. We recommend getting this hammer arrestor. It’s made of copper, and you can screw it onto a supply stop valve’s 3/8″ compression outlet in a few minutes.
If your home was built after the 1990s, it most likely has hammer arrestors installed.
I know what you’re thinking:
“Then why do I still hear loud noises from the pipes every few minutes or at night?”
There could be a few reasons:
- Occasionally, hammer arrestors can be missing from an otherwise modern plumbing system if the previous work was done as a DIY project.
- Although rare, one of more arrestors might have malfunctioned. However, we recommend you check for your home’s water pressure before replacing the arrestors. This is detailed in the next step.
1.4 Use a Pressure Reducing Valve to Reduce the High Water Pressure in Your Home
EXPERT TIP!
As more people work from home, this has forced water companies to increase their pressure to keep up with the demand. High water pressure has made the water hammer problem worse.
Kurt Joyce, Construction Service Owner based in Phoenix, AZ.
The normal water pressure for a home is between 40 to 60 PSI—ideally around 50 PSI. If your home has a water pressure of 60 to 80 PSI, it can defeat the air chambers and arrestors.
Besides the noise, here are some additional reasons why you don’t want such an excessive water pressure in your home:
- It can lead to leaks in pipes. Even a small leak can cause major damage to a home over time.
- It can put abnormal wear and tear on your pipes and joints.
- It can decrease the lifespan of your appliances, such as washing machines, dishwashers, and water heaters.
- It can increase your water and energy bills due to an increase in the amount of water that requires heating.
Sounds bad enough? Let’s get this fixed!
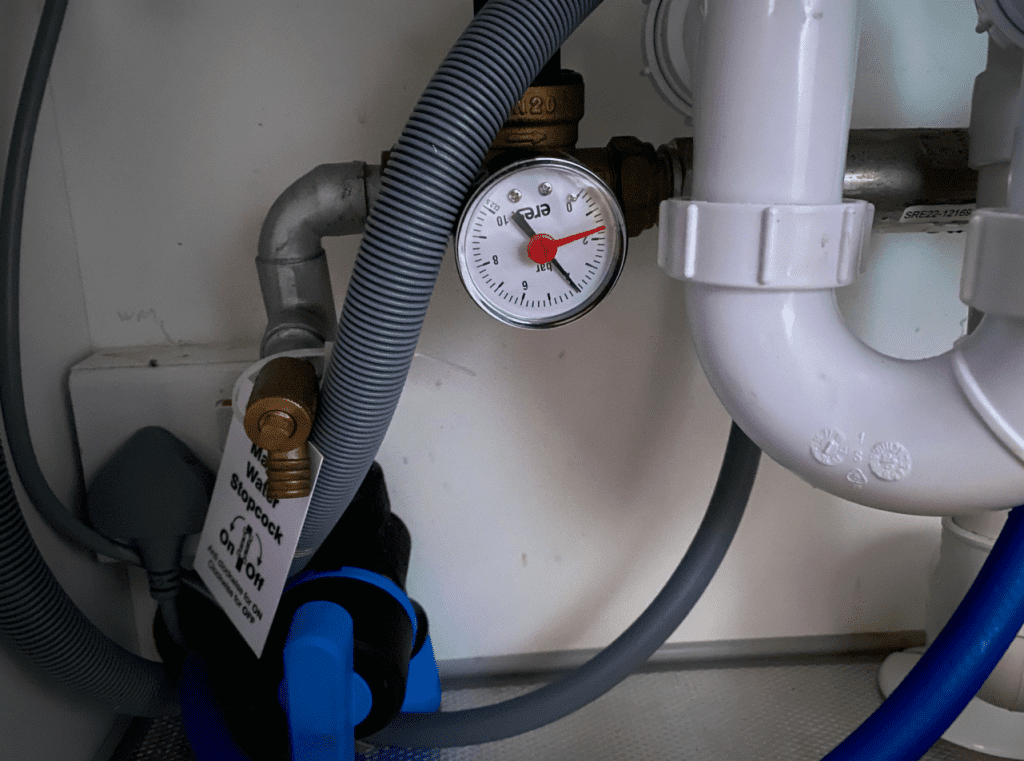
First, you’ll require a simple water pressure gauge to measure the water pressure at your home. We recommend a “lazy hand” pressure gauge that threads onto any hose bibb. It features an additional indicator that remains “stuck” at the highest pressure until you reset it. This will help you know if you’re experiencing any pressure surges/spikes.
We’ve been pretty happy with our inexpensive Measureman water pressure test gauge. It’s precise, well-built, and comes with a hose thread and a rubber gasket.
Here’s how to test your home’s water pressure using a pressure gauge:
- Choose the outdoor hose spigot closest to the main supply line for your home if your water comes from a municipality.
- It’s recommended to turn off all the appliances that use water to get the most accurate reading.
- Screw the gauge onto the faucet. Use the rubber gasket to get a good seal.
- Turn on the faucet completely and check the reading on the dial.
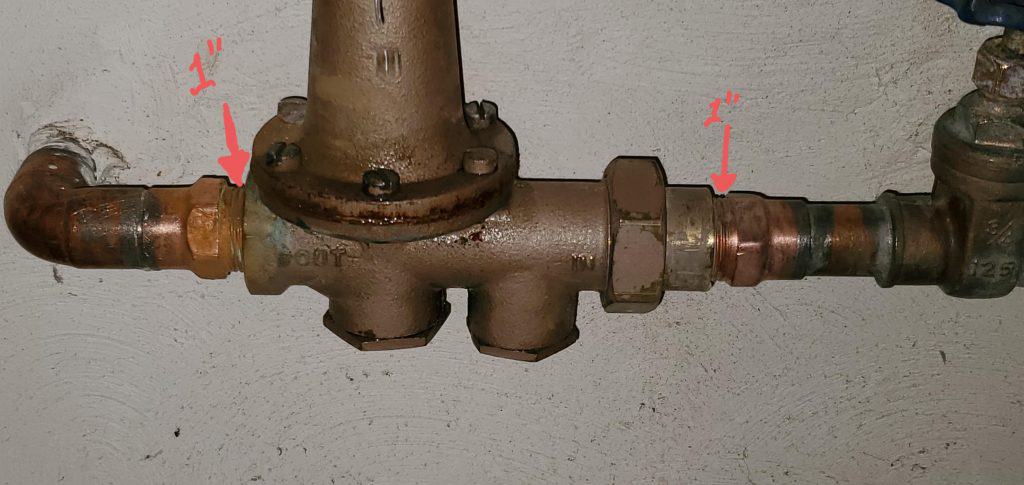
If the dial reads above 60 to 80 psi, installing a Pressure Reducing Valve (PRV) is a good idea. This valve, sometimes called a pressure regulator, automatically decreases the incoming high pressure for your home. In some states like Georgia, PRVs are required by code to be installed in homes.
Installing a Pressure Reducing Valve should help you stop the water hammer noise.
1.5 Nothing Works? Install a Slow Shut off/Gentle Toilet Fill Valve
Does it still sound like your pipes are about to explode from the wall?
One of our old toilets had a terrible fill valve. It shut off so abruptly that it seemed impossible to avoid a water hammer. We replaced it with Korky 528MP QuietFILL, and it fixed the issue.
The Korky QuietFill replaces the ballcocks type float valve that gets nearly full and slams shut. We’ve heard mixed reviews with FluidMaster.
From our experience, following the steps above should solve the issue in most cases.
However, we understand there might be a few borderline cases when none of the above tips help. Therefore, we recommend you verify using all the steps above before proceeding to the below ones.
2. The Problem: Rattling Sound in Plumbing Pipes? Pipes May Have Become Loose From Their Support
The pipes may vibrate if the straps connecting your plumbing to your home’s studs are loose. Funnily enough, this can be caused by the water hammer. The pipes may be loose from their straps, leading to a banging noise when the water pressure increases.
The Fix
You might be able to fix it by securing the loose pipes to the frame with pipe clamps. Unlike other ways, we recommend you get your system visually inspected by a plumber. They can help diagnose the issue and screw the clamps or straps into the appropriate joists or studs.
3. The Problem: My Toilet Makes Whining Noise From Pipes After Flushing
The Fix
- Replace the ballcock assembly.
- A loose or worn-out washer can also cause loud hammering. It could also be a looser washer in the angle stop, but in our experience, it’s the fill valve. Replacing the fill valve and seal is easy and can be done in under 15 minutes.
4. The Problem: My Toilet makes Froghorn Sound
The Fix
- Unclog Your Toilet Drain: You can also hear a loud bang if the drain is clogged when you flush the toilet. This can often happen if you flush the wrong items down the toilet. You can use a simple plunger to unclog your toilet.
- Clean or Replace the Fill Valve: The flapper holds the water in the toilet tank as it travels from the supply. A worn-out diaphragm can lead to a fluttering sound if the valve closes and opens rapidly due to a worn-out diaphragm. This can be easily solved by replacing your toilet fill valve and flapper.