
The environment is getting noisier day by day. It has almost become impossible for even homes to be peaceful and relaxing.
I am a musician myself and I record my music in my home studio. I had never thought that living in a metro city would bring so many problems for my music. There is a constant noise of the vehicles on road, and the neighbor’s dog is a whole different story!
I finally decided to do something about this.
I started researching sound absorption panels (also known as acoustic panels). I knew I had to make one from scratch as I didn’t want to spend so much.
Finally, I made a cheaper version of an acoustic panel and hung it in my recording room. Trust me, I have never been happier.
Do you find yourself in a similar boat?
Well, here’s how you can DIY your own acoustic panel without having to burn a hole in your wallet:
Things You Will Need: At a Glance
| Sr. No. | Product | Price |
| 1. | Wooden Boards | Check Price |
| 2. | Canvas Fabric | Check Price |
| 3. | Insulation- Rockwool | Check Price |
| 4. | Wood glue | Check Price |
| 5. | Wood screws | Check Price |
| 6. | Staples | Check Price |
| 7. | Stapler | Check Price |
| 8. | Frame hangers | Check price |
Tools Needed
- Drilling machine
- Cross-head screwdriver
- Saw (handheld or electric)
- Measuring Tape
- Serrated knife
Steps-by-Step Guide to Making a Sound-Absorbing Panel at Home:
1. Planning
According to where you want to place the panels, plan the build and the placement of the panels.
You will need to use materials according to the plan you make. For example, if you want 2 panels, you will need materials accordingly.
2. Gather the Materials
Now that you know that where you want to place the panels and how many you want t make, you can now start gathering the tools and materials required.
If you do not have any mentioned products available, you can always order them online via the links provided above.
3. Make Frames by Cutting the Wood
If you can acquire wooden boards, the process is pretty straightforward and simple.
You can cut the wooden boards by yourself using a saw. You can also go for a short cut and get your local lumber and hardware store to do it for you.
Make sure that the frames are straight wooden strips and not bent or twisted even a bit.
Now, after the wood is cut, place your wooden strips in the shape of a frame and drill the screws to hold them in place.
You can use 2 screws on each side. If you are still in doubt, use the wood glue to hold the frames in position.
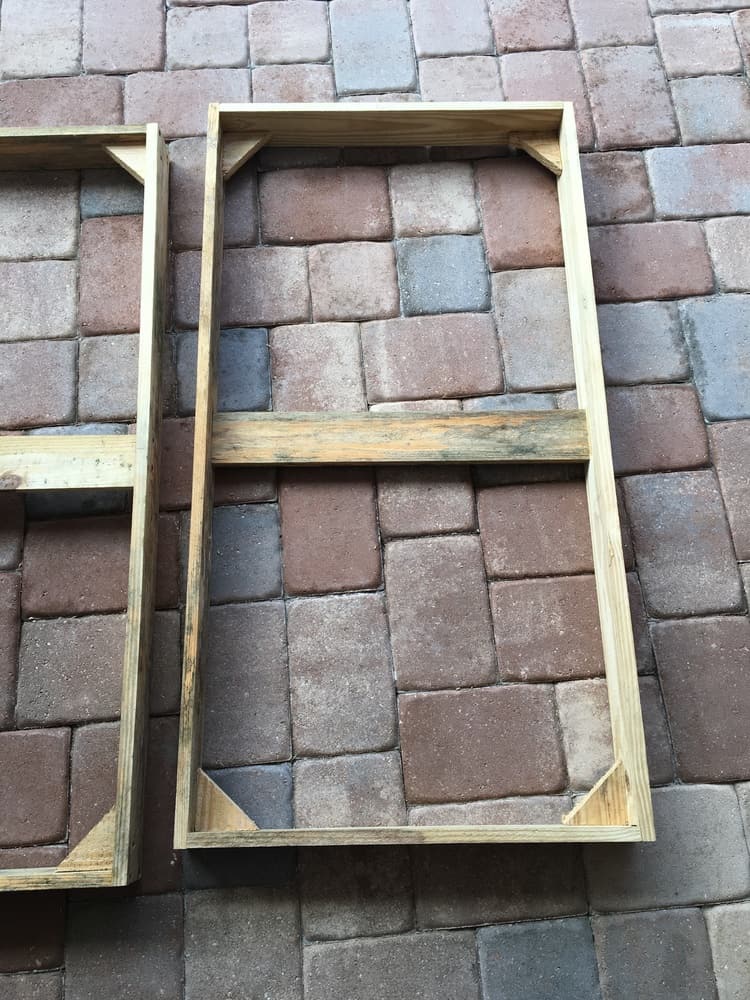
4. Reinforce the Wooden Frames
Now, to make your frame even stronger and sturdier, Use a wooden strip and drill it right in the middle, horizontally, so that the frames have support to stay in the same shape. This will also create support for the insulation.
You can also add corner pieces for better insulation support. It should look something like this:
5. Fill-in the Insulation
Using a serrated knife, cut the insulation so that it fits perfectly in your wooden frames. Position the insulation such that the bottom face of the panel is flat and level with the wood frame.
You will want the frame to secure tightly around the insulation, compressing it slightly. Make sure you protect your hands by wearing gloves.
You can use the Roxul Mineral-Rockwool panels as insulation. You can drill wood screws to keep the insulation in place or simply use wood glue.
Make sure you give these rough panels enough time to dry before you go to the next step.
6. Cover With a Sound Transparent Fabric
Now that your panels are dry and ready, cover them with a sound-absorbing material. You can use Guilford of Maine burlap or any other material like duck canvas (premium, pricey product).
Lay the finished frame properly with the fabric. Make sure you cute out enough extra fabric so you can staple it in the back of the panel.
7. Staple Fabric in Place
Go for the long vertical side first. Leave the corners for now. Once you staple all sides neatly and tightly, you can jump to the tricky part- the corners. It like neatly wrapping a gift. Make sure you do this very neatly.
Once you staple your fabric – the panel is almost completely ready. The back of the panel isn’t the most attractive thing but you can cover it with another fabric or just let it be.
No one is going to look in the back anyway!
8. Finally—Hang the Panel
Your panel is now ready!
Just like any other artwork, you can put them on your wall!
You can hang these using frame hangers or Z clips. Generally standing them slightly off the wall will help with bass trapping. Make sure you place the panels correctly.

FAQs: Frequently Asked Questions
What are the Acoustic Panels?
Acoustic panels are like boards that you can put on a wall or ceiling that absorbs noise. The more multi-directional the sound-producing system, the more bounce back noise being produced.
These panels absorb sound with mid to high frequencies and return a much sofer noise. They are usually made of foam or some type of insulation.
They can be hung on a wall, a ceiling, or can simply be free-standing. Song panels can be covered by fabric or artwork if you would not like them to be seen.
What Are Sound Absorption Panels Used For?
It doesn’t matter where you put up a soundproofing panel- a restaurant, a banquet, in offices, at your home recording booth- these panels will fight the external noise pollution. They are often used in noisy areas and reduce, correct or absorb noise pollution.
You will find various designs, shapes, sizes, and colors available- or you can just DIY one according to your choice.
Where can Acoustic panels be used?
Soundproofing panels are ideal in a variety of spaces, including:
- Condos: to make it into a more private space to live in.
- Auditoriums: to reduce background noise and improve the clarity of sound.
- Libraries: to increase focus and decrease unnecessary outside noise.
- Hostels: to provide peace and an environment in which you can focus.
- Dance studios: to make sure the loud music doesn’t leak to continue a peaceful environment.
- Home recording studios: to cut the extra noise and give a fine voice recording.
How Do Sound Insulating Panels Work?
Soundproof panels are made of foam and mineral wool. When sound waves travel around the air then hit soundproofing panels they will vibrate and increase friction around the pores of the fibers.
The vibrations reach a point where there is enough friction created for the conversion of energy to the heat energy which means there is energy from an object in motion. This type of energy cannot be contained which means it dissipates quickly, so there are no sound waves left and no natural sound.
Thus, soundproofing panels stop the noise from entering or exiting rooms.
What is the Best Fabric for Acoustic Panels?
It is possible for acoustic panels to completely mismatch the decor or the setup of the place you put them. Moreover, they need to be covered to avoid losing fibers. Fabric covers need to be noise permeable.
You can test the fabric by holding it up to your face and seeing if you can easily breathe through it. Even if there’s a little resistance, you should leave that option out.
Always select a fabric color and design that will go with your home decor or artwork in the room.
Guilford of Maine is a good option. It is a recycled polyester material that comes in 12 colors. It is stretchable and has great tear strength.
How Thick Should Acoustic Panels Be?
Acoustic boards are usually 2″ or 4″ thick. The thicker board ought to assimilate lower frequencies better. The 2″ board will be less bulky on a wall, so may blend all the more stylishly relying upon the utilization of the space.
You can start with 48 ft² of panels for your media room or studio, and then add more as needed.
How Many Acoustic Panels do I Need?
You may need a number of acoustic panels depending on your aim, the size of the room, the size of the panels, etc.
Where do You Place Acoustic Panels?
First of all, you need to be sure of what your aim is. Then you should check where you can install the acoustic panels.
Here are some different types of rooms that might need acoustic treatment:
- Recording studio
- Listening room/ banquet halls
- Home theater
- Home recording booth
No matter where you are using them, remember to follow these rules of thumb when hanging acoustic panels:
- Hang them symmetrically
- Space them out
- Don’t place panels too high
Final Thoughts
Sound absorption panels or acoustic panels are used to eliminate echoes and reflections that muddle or color amplified music and speech. These wall panels will also reduce reverberation levels in a room, which can sometimes provide ample noise reduction.
Buying these acoustic panels can burn a hole in your pocket. So why not DIY it? Gather a few materials and follow the above steps to get your acoustic panel ready.
Now that you know that there is, in fact, a cheaper way to build something that can change your life in some aspects, do give it a try.
Drop your queries in the comments below.
Always happy to help!